Thursday, February 28, 2013

Pasta, Sick Days, & Duck Dynasty

My blog posts haven't gone exactly as planned this week! Being non-stop busy and sick at the same time doesn't work out so well.. So yesterday I took a day off from work to get some much needed rest to start feeling better .. and thank goodness I am! My day consisted of the following..

9 AM When mom is sick, the babe is sick.
http://mail-attachment.googleusercontent.com/attachment/u/0/?ui=2&ik=c0779d4b58&view=att&th=13d2162c273d9c66&attid=0.1&disp=inline&realattid=1428228400032514048-1&safe=1&zw&saduie=AG9B_P--eh6KcPVgF5R0u5k3gdpl&sadet=1362064844631&sads=nc9S-lXTrAvgbHAo7RhIFbggGXY  

10 AM Admiring my Frye boots :)

11AM Coop & his baby have a disagreement

12PM Start doing a little spring decorating
http://mail-attachment.googleusercontent.com/attachment/u/0/?ui=2&ik=c0779d4b58&view=att&th=13d216278f7264a1&attid=0.1&disp=inline&realattid=1428228376324210688-1&safe=1&zw&saduie=AG9B_P--eh6KcPVgF5R0u5k3gdpl&sadet=1362065717394&sads=4ExJNLWKOcD4D9qpfvRTjaHSeuI

1PM Decided to paint the fireplace..
(Before: Stark White)

In process.. Only part of the top is painted, and is still wet, thats why it looks lighter in some areas..

Finished product.. (Sorry for the terrible picture quality, it was cloudy and I was using my phone sitting on the couch.. HA!)

It's hard to tell much in picture, but it looks so much better. So now, I am in the process of painting all of our baseboards, crown molding, and wainscoting in this color. I may be slightly insane.

2PM - We facetimed with daddy :)
http://mail-attachment.googleusercontent.com/attachment/u/0/?ui=2&ik=c0779d4b58&view=att&th=13d216296ef9b518&attid=0.1&disp=inline&realattid=1428228387234643968-1&safe=1&zw&saduie=AG9B_P--eh6KcPVgF5R0u5k3gdpl&sadet=1362067437057&sads=N5rAnLq64CWlNdg-e9Fn1AwMNOM


3PM Watched Kourtney & Kim take Miami and scoured the internet to find these beautiful chairs...
obsessed. 

4PM (Clearly I was running out of things to do at this point..)


Finally around 5PM the mister got home and I was feeling much better! So I decided to throw together a simple pasta dish just in time for our favorite shows to come on ... In the Middle, Modern Family, Saburgatory, The Neighbors, Nashville, and Duck Dynasty! Seriously, Wednesday nights we are glued to the TV ha!

But anyways.. this pasta, ya'll, once again, super simple & so good! Obviously, the picture is a little disturbing, but that doesn't matter! ha!


Ingredients:
1 Package Hillshire Farm Turkey Sausages (You can use any brand, and any flavor, we just prefer the Hillshire Farms Turkey Pepper Jack)
1 or 2 Cans Died Tomatoes (Fire Roasted Style)
1 Cup Spinach (Frozen or Fresh)
1 Cup Chopped Mushrooms 
1/2 Cup Chopped Onion
Rotini Noodles 
Parmesan Cheese 
Fresh Garlic
Olive Oil
Any Seasonings
 (I used Garlic Powder, Onion Powder, Pepper, and a small amount of Garlic Salt) 

Directions:
Begin with heating your garlic and olive oil in a pan. While the pan is heating begin dicing up your onion, sausages, and mushrooms. For this recipe I only used three sausage links, but feel free to use as many as you like. I cut the sausage link width wise so my pieces were slightly thick, and the size of a quarter (I have no idea how to explain this otherwise haha)

When all the sausages were cut up, I added them to the pan first over medium heat letting them brown. Next I added in the onions, then mushrooms and let everything sautee together just until the onions and mushrooms began to get soft, once at this point, add in your can of diced tomatoes (including juice) and allow to simmer.

While simmering, bring water to a boil in a medium pan for your noodles. Once it begins to boil, add in your noddles and cook according to directions.

When your noodles are almost finished cooking, add in your spinach, seasonings, and fresh Parmesan cheese and mix everything together, including noodles!

Serve immediately, topped with additional grated Parmesan cheese. Enjoy!


Monday, February 25, 2013

Weekend Update!

Hi Ya'll! Surprise, surprise it's Monday again! And a cold one at that! Feeling pretty accomplished after this weekend, got a lot of things crossed off my to-do list plus a few loads of laundry also!

If you follow me on Instagram you pretty much know what my weekend consisted of! So here is a little photo dump for my weekend..

Friday night we had tilapia tacos and they turned out better than expected! Also, watched the season finale of Gold Rush -- does anyone else watch this show?! I am obsessed haha!

Saturday we slept in .. some of us longer than others ;) Cooper would not wake up to save his life! But, of course when I asked if he wanted to go to grandma's (my mom's) he was ready to go! Ha! 

Got in some much needed retail therapy on Saturday and picked up my new bedroom lamps, which if we're friends on Facebook I am sure you have seen my cry for help regarding our bedroom lamps. But, here's the deal .. Since I literally could not decide on one or the other, even after my five million comments on Facebook, I decided to buy both sets of lamps. BUT, of course, went to pick them up Saturday and they only had one left in stock of my 2nd choice, and none of my first choice... GO FIGURE! So I bought the last one, and will just have to order the other online. So to sum up that story, my bedroom still looks just like this..


Also, since I was still semi rocking the winter-ish decor around the house, I decided it was time to add in some spring-like decorations! I picked up these vine like stems at Pottery Barn, and the glass jug on clearance for $18.


Sunday was ridicuously productive and I am glad! Woke up, made our weekly meal list, planned out my grocery trip, did some laundry and took Coop for a walk .. It was B-E-A-U-tiful outside ya'll. 

While at the grocery store I discovered this little gem.... Pretty much, if Cody could marry a type of candy, this would be his girl. He loves these things, and this one just so happened to be like the size of my palm. HA!

Once home I completely organized all the kitchen drawers/refrigerator/restocked the pantry and got everything ready for our lunches/dinners this week. And then, it was time to FINALLY start staining my beautiful new farmhouse table that my sweet babe built for me ;) I am so in love with her, and I am super happy with how the stain turned out. I will be posting our instructions on how we completed it later this week! Now just to find chairs... Hmm.


Then Sunday night of course we watched the Oscars, and I couldn't stop drooling starring at all the BEAUTIFUL dresses! I mean let's be real here... these are just some of my favorites, I am sure I could find a hundred more that I loved! I think Jennifer Garner stole the show for me. I loved the color, the detailing in the back, just everything about it.


Hope everyone had a fabulous weekend!

Saturday, February 23, 2013

Tilapia Tacos w/ Sweet Bacon Slaw


Usually on the weekends, we tend to eat out both Friday and Saturday night with friends. But, this week the mister is on call for work, and it was the season finale of Gold Rush so we were homebound for the night! 

We have been on a fish kick lately, but I was craving tacos (surprise surprise! ha) so I decided to make tilapia tacos. I looked up a few recipes online, but nothing was really sounding great, or had three million ingredients in which I didn't have, and I am all about simple, especially on a Friday night!

So, after thinking on it for a while, I decided I was going to do a recipe similar to one my daddy makes, but add my own touches. I stopped by the store on the way home, picked up a few ingredients and was ready to go! This recipe is so quick and easy, and perfect for any night of the week!

Ingredients:
Frozen or Fresh Tilapia
1 Bag of Coleslaw Mixture
1 Jar Coleslaw Dressing
Bacon Crumbles (Bacon is so messy to cook, so going with my simple theme, I just picked up the jar kind!)
Yellow Corn Tortillas
Vegtable Oil
Old Bay Seasoning

Directions:

I began with mixing the coleslaw mixture and dressing together so it will have time to sit and blend together while I prepare the tilapia. This part really just depends on how many tacos you are making. I filled up a medium glass bowl with the coleslaw blend and then added the coleslaw dressing until it was the desired consistency we wanted. Once you have it to your desired consistency, add in your bacon, mix well, and set in the refrigerator until ready to serve.


Since I buy frozen tilapia, it is already individually packaged into single serving sizes. I just remove from packaging, rinse well, and place in a hot skillet coated in extra virgin olive oil. Sprinkle each side with any seasonings you prefer (I just use Old Bay), and cook until you can flake apart the fish with a fork. 

While your tilapia is cooking, heat vegetable oil in a small pan on medium heat. Once it begins to heat up, take one corn tortilla and place in oil, let cook 30 seconds, then flip over and cook for an additional 30 seconds. Remove from oil, and place on a plate layered with paper towels to let the excess oil drain off. Continue until all shells are cooked. 

Once everything is prepared to your liking, layer taco shells with coleslaw, tilapia, and any other toppings you prefer and enjoy!


Friday, February 22, 2013

$6 Rustic Chalkboard Crate

I am so humbled by the overwhelming response some of my posts have gotten on my blog. I know it's a silly thing to most people to get excited about .. but, as of the beginning of February, I had MAYBE 400 views on this blog. Now. granted I didn't post much, I just liked to stalk read other blogs.

But, let me tell ya'll something, apparently people LOVE buffalo chicken. I mean so much so, that in the one day alone that I posted my Buffalo Chicken Sliders onto my Pinterest, I had over 2,000 page views just to that one post alone. I was shocked. But, at the same time, so happy with peoples response to them. I mean after all, they are to die for good. So, I just wanted to say thank you to all my new readers that I have gained, and I hope to bring you more recipes and ideas that you can use in your own life :)

So today I wanted to share a simple and super cost efficient storage solution. A few days ago I posted about our Pantry Makeover and you may have noticed the little chalkboard crate at the bottom of the pantry in which I said I would be posting a how-to on how I turned it into a chalkboard basket to store all of our extra items in the pantry.


This thing was probably the easiest/best $6 I've ever spent. Our local Home Depot started selling these wooden crates/storage boxes around Christmas time and I knew I could do something with them, so I scooped two up and brought them home..


Originally I was planning on using them for blanket storage in our living room, but once the pantry was complete a little light bulb popped on in my head and gave me the great idea of using them for all of the miscellaneous items the bottom of our pantry seems to collect. I already had the stain on hand, as well as the chalkboard paint.

I started out by staining the entire crate in Mixwax Jacobean. It turned out a little darker than I originally wanted, so I rough sanded it once it was dry, and gave the stain great color variation in some spots :)
Once the stain was completely dry, I sprayed one end of the crate with two coats of chalkboard paint spray paint, aka heaven in a can ;) Once it was dry, I put all of the extra items in there and there you have it .. simple, stylish, and efficient!


Wednesday, February 20, 2013

Pantry Makeover .. DONE!

So, if you remember a few weeks back to my pantry moth meltdown I explained how we were in the process of completely redoing our pantry and it would be done by weeks end.

Well, I'm not really sure what world I was living in, because "weeks end" just happened to be two and a half weeks later! Life gets busy sometimes, so please excuse my lack of timing.

But, the pantry is finally complete and I couldn't be any happier with how it turned out! The entire project was fairly inexpensive (Seriously, thank God for 50% weeks at Hobby Lobby) the glass jars were the most "expensive" part, and I think on spent somewhere around $80 on jars. I picked up the woven baskets at HomeGoods, the wood shelves were just one piece of wood from Home Depot that cost around $12 and we cut our own shelves from it, and the brackets to attach the shelves to the walls were 2/$8 and we have ten total (2 for each shelf).

Other than that, I had the spray paint on hand to paint the shelves, and we also put a fresh coat of wall paint on which we also had on hand. So without further adieu, here is our pantry! Also, please excuse the terrible picture quality, it is so hard to take pictures of a pantry .. So, that is why in our next house I have requested a walk in pantry ;)

Here is the picture I posted a few weeks back as our "before" shot...


So, looking back at this picture, I am kind of ashamed to admit that I use to consider our pantry "organized" HA! 

And here our pantry is today..


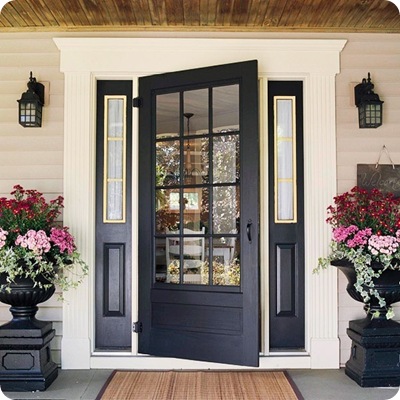
Not only has the makeover created so much more space, cooking dinner at night is a dream with this pantry! Everything is so easy to find, and just goes right back into its place once I am done with it! I love it so much, that I have considered removing our standard builder grade door and replacing it with a glass door ... something along the lines of this style..

black glass front door

Plus it would add so much character to the kitchen! But, anyways, that's another post for another day! So let's continue on with the pantry break down shall we....

The most important thing with this entire makeover was making sure everything was in sealed containers. After my moth freak out, I wanted to make sure all of our food, and Coopers food would not have any more intruders. Which led me to the glass container storage...


These containers are so awesome! One large container holds one box of cereal, or a standard bag of chips. The medium containers are great for smaller bags of chips, or a box of Tricuits! And by adding the chalkboard labels myself, not only did I save money, but it is so easy to change out what is in each jar, and just to re-label what is in there!


You can see in this picture where I have used a different style jar for all my baking goods (sugar, flour, ect.) I chose these jars because it is easier to fit measuring cups in and out of the opening at the top. 

Once all of the jars were filled, I had so much "extra" stuff just floating around, I wanted to contain it all some way, so I broke it down into woven baskets to create even more open space on each shelf.

I have four total baskets in the pantry..


How I chose what went into each basket was fairly simple. We have a lot of canned beans, so I immediately knew one basket would be just for canned beans because this would eliminate 80% of the can good clutter.

Next was the breakfast basket. I love oatmeal in the morning, and I generally have two or three boxes of different kinds on hand, so this was a no brainer for me to throw away the boxes and just place them neatly in the basket. Another reason for throwing away the boxes, after doing my research, moths actually love cardboard, and the glue that holds the cardboard packaging together, so I knew I wanted to throw as many boxes away as possible.

The "snacks" basket was up next. Cody loves his snacks. They are a grab and go kinda meal, and we all know men love simple! So I took all our granola bars, snack packs, and whatever other snacky foods that were floating around and stuck them all in one basket.

Now that the bulk of the cardboard boxes were gone, I had so many miscellaneous items laying around, I created a basket just for them! Which has worked out great. Things like peanut putter, spaghetti sauce jars, syrup, and some baking goods have found their way into this basket, and it's so nice to have all the extra crap just stored in one area.

Once everything was in the proper basket, I broke out my chalkboard labels that I made for Thanksgiving and tied them to each basket with some jute. Simple, and goes along with the chalkboard jars!

Now that the shelves were organized, it was time to deal with all the crap at the bottom of the pantry. Stuff like solo cups, paper plates, nakpins, placemats, ect. Please tell me everyone has this kind of randomness in their pantry .... yes? no?

Well, I wanted it all off the shelves and into it's own area. So I picked up some $6 crates at Home Depot that were pretty plain jane, did a little DIYness to them, and put all of our extras into them and called it a day!


So, there you have it, our pantry makeover! I will do a short post tomorrow on how we made over the $6 Home Depot crates, and what I plan on doing with our spice rack!


Tuesday, February 19, 2013

Simple Stuffed Shells .. On The Lighter Side!

I literally just threw these together tonight for dinner, and they turned out so good, I immediately wanted to post the recipe before I forgot it!


Ingredients:
Bertolli Large Shells
1 LB Lean Ground Turkey 
1/2 Medium Onion, Diced
Spinach (Frozen or Fresh)
1 Can Diced Tomatoes (I used Italian Style)
3 Laughing Cow Light Creamy Swiss Triangles
2 Tbsp Sun Dried Tomato Paste 
3 Tbsp Light Cream Cheese
1 Tbsp Pesto 
Parmesan Cheese

Directions:
Brown your turkey in a skillet, once almost cooked all the way through, add your chopped onion and can of tomatoes, including the juice. Let simmer on low heat while your shells begin to boil.

Once your shells are tender, remove them from the stove, drain and rinse immediately with cool water and set aside to dry.

While the shells are drying, in a small/medium bowl, combine your Laughing Cow Cheese triangles, cream cheese and two tablespoons of parmesan cheese and microwave for 30 seconds or until soft. Mix well, then add your sun dried tomato paste and pesto and mix well once again. 

Take your shells and stuff each one with your meat mixture, and place in a shallow glass baking dish (be sure to spray the bottom of the dish with PAM before placing the shells in it). Once all your shells are filled, top with your alfredo mixture, and then sprinkle lightly with parmesan cheese. 

Pop into oven at 425 degrees for 10 minutes, or until they are slightly golden on top. Serve while hot with your favorite side dish for Italian and enjoy!

Monday, February 18, 2013

Weekend Update!

It's President's Day, and while most of the country is still snuggled in their warm beds, I am at the office, just workin away! Even though I would much rather still be at home snuggled in bed with my sweet babies .. I have a busy week ahead with houses to sell and sweet clients to help :)
Although the weekend was much too short, per the usual, it was a huge success in my books! The end of last week was absolutely crazy with all the construction going on at the office, so I played catch up Friday evening and then again Saturday morning, and it was so nice to get in a few hours of work completely uninterrupted! Which meant my Friday night consisted of this...
                                Photo: Someone just really wants to snuggle.
 Seriously, is he not the sweetest thing you have ever seen? Just love him :)

Saturday afternoon I showed a few houses, and then drove my happy little self to the mall. Anyone who knows me, knows I completely despise going to the mall, as much as I love to shop, the mall traffic is enough to drive any sane person crazy .. So clearly I was on a mission!

I wanted to find new bedding for one of our guest rooms, and of course, Friday night browsing Pinterest, I found the perfect bedding..
                                 

Saturday I went to Pottery Barn and was determined to leave the store with it, yea, not happening ya'll. After spending about an hour with their design consultant calling nine different stores in nine different states, I came up empty handed. But, at the same time, I had a moment of clarity .. why the hell was I buying $400 worth of bedding for a guest room that will only be used a few times a year?! So after regaining my sanity, I decided I was going to buy all new bedding for OUR room! Duh.

So since Pottery Barn left me more than heartbroken disappointed, I made my way over to Target, my other guilty pleasure and proceeded to walk up and down the home decor isles for more hours than I ever want to admit. But, I did leave there on happy lady. Talk about love at first sight...
                               
Photo: Can't wait to snuggle up in these little babies tonight. Love new linens :)

But, no task is ever simple when it comes to me and decorating. I then had to run back to Pottery Barn, then to TJ Maxx, then back to Target, but when all was said and done, I had a trunk full of new linens, and my wallet wasn't crying from Pottery Barn prices!

My Saturday night consisted of much needed alcohol, friends, and our favorite Mexican joint! Yumm yum!
http://distilleryimage9.s3.amazonaws.com/907b25fa789a11e2939b22000a1f9251_7.jpg

Sunday was a serious day of cleaning. But, first, it started with the mister doing his very first Pinterest project WITHOUT my request! HA!
If you have never seen this on Pinterest, I recommend it! Add caulk to the bottom of your rugs so they don't slip all over your hardwoods! Seriously, genius! 

Since we are getting ready to put our house on the market, we have been doing little things here and there to get it ready. We completely dedicated yesterday to cleaning out all of our junk closets upstairs, and I think I also did roughly 467 loads of laundry. How exactly do two people accumulate so many clothing items? Its semi embarrassing. But, our upstairs is lookin' mighty fine, and mighty clean! Oh, and did I mention I have a serious crush on our bedroom thus far?


I still have some big plans that I hope to get finished this week, but I am just too smitten with the way it is coming along! Is it crazy that we actually thought about sleeping in the guest room last night so we didn't mess up the bed .. HA! I can't wait to post what I have in store for the nightstands!! ;)

Anyways, we ended our night with some homemade spaghetti, and attempted to watch The Walking Dead, for the first time ever, maybe it's because we are so far behind/have never watched it, but that show is so weird. I'll stick to my regular Duck Dynasty, Honey Boo Boo, and Buckwild marathons instead! HAHA! 
 http://distilleryimage8.s3.amazonaws.com/f68a2b54795b11e2aaa822000a1fb0dd_7.jpg

Hope everyone had a fabulous weekend .. and I can't wait to post on our finally finished pantry renovation that you will LOVE! :)